How to Set Up a QuickBooks Webhook to Connect to a Pipedream Source

What if you want to trigger a Pipedream workflow every time a certain event happens in QuickBooks? For instance, maybe you have something you want Pipedream to do every time a new purchase order is created or every time an invoice is sent to a customer.

A webhook is perfect for this scenario, especially if you want to run your workflow as soon as possible after the event happens. Without webhooks, you’d have to create a polling source that runs on a timer and checks QuickBooks for changes periodically. But the more often you check for a change, the faster you’ll burn through your Pipedream invocations. With webhooks set up, Pipedream doesn’t have to do anything until a notification comes in from QuickBooks. Swap out your polling sources for webhook sources and your Pipedream usage will drop dramatically:

So how do you set up QuickBooks to send webhooks to your Pipedream source? The process is not hard if you know what you’re doing, but there are a lot of steps. Unfortunately, there’s no way to automate this process — it has to be done manually for each endpoint you want to set up. My goal in this tutorial is to make the setup process as quick and easy as possible.

Step One: Set Up an App with Intuit Developer

If you don’t have an Intuit Developer account, you’ll need to sign up. Don’t worry, it’s easy and free.

Once you’re signed in to Intuit Developer, go to the Apps Dashboard and click the Create an App button. Each app you create will be able to send webhooks to one source in Pipedream.

Choose QuickBooks Online and Payments on the next screen. After that, give your app a name and choose a scope. If you’re just setting up webhooks you only need the Accounting scope.

After you create the app, you might have to wait a minute or two before it’s available. Click on its name in the list on your dashboard to configure everything.

Step Two: Complete Production Settings

Before you can authenticate with your QuickBooks company, you have to configure a few settings in your new app. First, make sure your email address is verified. Then click Production to add Terms of Service Links. Even if you’re creating an app for internal use only, you still have to put something. I just created a couple of simple Google Docs files that say my app is intended for internal use only and no information will be shared with third party vendors.

You’ll also have to make a selection for Target Industries.

Once you’ve filled in this information, you’ll have access to your production keys.

Step Three: Authenticate with OAuth 2.0 to Create a Connection

QuickBooks requires a successful OAuth 2.0 connection before it will send any webhooks. You might think that if you’ve connected your QuickBooks account in Pipedream that it would be enough, but this creates a connection between your QuickBooks company and Pipedream’s app. In order to receive webhooks, you need to get your newly created app connected as well.

I did my OAuth flow in Postman since that’s what I’m familiar with. To follow along with the next part of the walkthrough, click here to fork my Postman Collection:

Run in Postman

The first step is to fill in a few collection variables.

Go to the Production Keys & OAuth section of your Intuit Dashboard. Scroll down to the Redirect URI section, click the Add URI button and fill in https://oauth.pstmn.io/v1/browser-callback as the link. (If you are not authenticating in the browser, use https://oauth.pstmn.io/v1/callback as the link instead. You need to have a Redirect URI that matches what is shown in the Callback URL field when you go to configure a new token in Postman.)

Click Save at the bottom and then go back up to the Keys section. Copy the Client ID and Client Secret values and paste them into the corresponding collection variables in Postman. (Click the QuickBooks collection and go to the Variables tab to view and edit collection variables.)

Save the collection and click the dropdown to open the Get Auth and Token URLs request. Hit the Send button. This will automatically fill in the auth_url and access_token_url collection variables.

Go back to the QuickBooks collection and this time choose the Authorization tab. Scroll down to the bottom and hit the Get New Access Token button.

Follow the prompts to sign in to QuickBooks, select your company, and approve the connection.

Step Four: Create your Pipedream Source

I’m working on a QuickBooks-specific source for Pipedream but it’s not published yet. In the meantime you can just create a regular HTTP source to use as your endpoint URL in the next step. Your source will look a little different from the screenshots and you can ignore the part below about adding the verifier token to your source configuration.

Step Five: Configure your Webhook

Go back to the Intuit Dashboard and choose the Webhooks section under Production. Here is where you will fill in your Endpoint URL, copy the resulting Verify Token, and select which events you want to send as webhooks.

Copy the endpoint of your Pipedream source and paste it into the Endpoint URL field. If you want to limit the webhooks you send, click the Show Webhooks dropdown and choose which entities and actions you want to receive as webhook events. (They’re all selected by default but you can uncheck Entity to clear everything.)

Finally, find your Verifier Token right below where you entered the endpoint URL and paste it into the configuration tab of your Pipedream source.

Test your setup by going to your QuickBooks Online company and making a change that matches one of the webhook events you selected. If you see this event appear in your event queue, you are done. Whew!

Troubleshooting Steps

If nothing shows up in the event queue, you might have a problem with your setup.

First, check the Logs tab to see if there are any error messages.

  • If the webhook did not pass verification, try adding your verifier token again. (Since it’s a secret prop, you won’t be able to view the current value once it’s entered. You’ll just have to grab it again from the Intuit Developer dashboard.)
  • If the operation was not found in the list of selected operations, make sure you’ve selected all the operations you want to emit and that you’re testing with a change that’s included in that list.

If you don’t see anything under logs, it means your Pipedream source is not receiving any webhooks at all. You can double-check the following:

  • Have you activated your Pipedream source? (Make sure the little toggle switch at the top right is green.)
  • Have you entered the correct endpoint URL on the Intuit dashboard?
  • Is the relevant event trigger selected on the dashboard?
  • Have you successfully connected your app to your company via OAuth 2.0? (Check out the connection count on the main dashboard page — if the app has zero connections, it will not send any webhooks.)

Finally, are you making a change in the correct QuickBooks company? To see which companies are connected, click the app name, click Connections under Production and click the name of the current month. This will list the company/realm ids of each company that has been connected via OAuth 2.0.

Make sure this page shows a realm id that’s the same as the company id of the QuickBooks company you are working with.

The final possibility is that the webhook is just delayed. I’ve noticed that sometimes with a brand new webhook, the very first event can take a while to come through. This can also happen after changing the endpoint URL of an existing webhook — in the evening the webhooks were still going to the old source but when I checked in the next day, the new source had received a batch of those same webhooks in the middle of the night. After that they all went to the new source right away. So if you’ve tried everything and it’s still not working, it might just need some time.

If you run into a issue that I haven’t covered, please leave a comment below so I can update the guide!

Zoho CRM: How to Upload an Attachment to a File Upload Field Using the API

Say you’ve added a custom file upload field to one of the modules in Zoho CRM and now you want to add files to this field using the API. For instance, you have a field for purchase orders on your Deals module and you want to add PDFs to this field automatically whenever a purchase order is sent. If you’re trying to do something like this, here’s what you need to know:

Use Files API, not Files & Attachments API

Use the Files API to upload your file. Don’t use the Files & Attachments API — that one is for adding attachments to the whole record rather than to a specific field of the record. Don’t ask me why there are two separate APIs.

Upload Your File to Zoho File System

Before you can attach your file to a record you have to upload the file to Zoho File System (ZFS).

Send a POST request to https://www.zohoapis.com/crm/v2/files and in the request body put a multipart/form-data object with “file” as the key and your file contents as the value. If you send something different, you might see the below 400 error. (If you think you have everything correct and it’s still not working, double-check that you’re using an access token with the correct scope. You need ZohoCRM.Files.CREATE for this request to work.)

{
  "code": "INVALID_REQUEST",
  "details": {},
  "message": "unable to process your request. please verify whether you have entered proper method name, parameter and parameter values.",
  "status": "error"
}

By the way, if you’re using Postman to test your requests, the code snippet window is a really convenient feature. Once you get your request working, you can get a code snippet of that request in the language of your choice. This makes it very easy to transfer your request somewhere else. Here’s the Postman code snippet to upload a file to ZFS using Node.js and axios (with a few modifications so you can easily customize it with your own access token and file path):

const axios = require('axios');
const FormData = require('form-data');
const fs = require('fs');

//the access token must have scope of ZohoCRM.Files.CREATE
const crm_access_token = '<your_access_token_here>'
const file_path = '<your_file_path_here>' 

const data = new FormData();
data.append('file', fs.createReadStream(file_path));

const config = {
  method: 'post',
  url: 'https://www.zohoapis.com/crm/v2/files',
  headers: { 
    'Authorization': `Bearer ${crm_access_token}`, 
    ...data.getHeaders()
  },
  data : data
};

axios(config)
.then(function (response) {
  console.log(JSON.stringify(response.data));
})
.catch(function (error) {
  console.log(error);
});

When you successfully upload a file, you’ll get a response with an id at data[0].details.id. The name of the file is based on the file path given to fs.createReadStream() so make sure you are saving your file with the name you want it to have in the CRM.

//an example of a successful response
{
  "data": [
    {
      "code": "SUCCESS",
      "details": {
        "name": "2021-06-28 PO 12345 to ABC Corp.pdf",
        "id": "1efe88e82815727e4628959d9a6fb6df41627504a5a9a6b51890c8c7a12f44a5"
      },
      "message": "2021-06-28 PO 12345 to ABC Corp.pdf uploaded Succeessfully",
      "status": "success"
    }
  ]
}

Attach Your File to a Zoho CRM File Upload Field

Now that you have an id for your file, you can add an attachment to your record. Assuming you’ve already created the record, send a PUT request to the record endpoint. In the body of the request, use the API name for your file upload field and give it the value of an array containing the file id from your ZFS response.

Here’s my example for a field called HP_PO_Attachment:

const file_id = '1efe88e82815727e4628959d9a6fb6df7b0105e2480ee0eeb4d16b83e0d59a3d'

const request_body = {
    data: [
        {
            'HP_PO_Attachment': [file_id],
        }
    ],
}

Attach Multiple Files to a Zoho CRM File Upload Field

Did you know you can attach more than one file to an upload field? The default settings only allow one attachment per field but you can change that if you want to. Find your custom field on the layout setup page for your module. Choose Edit Properties and check the box to allow uploading of multiple files. This changes the maximum number of files from 1 to 5.

Remove or Replace Existing Attachments

If you try to add a file to a field that has already reached the maximum number of files, you will get an INVALID_DATA error.

code: INVALID_DATA
details {2}
    api_name: HP_PO_Attachment
    maximum_length: 1
message: invalid data
status: error

To avoid this error, you first have to remove a file that’s currently attached to the field. For this you need the attachment_id of the file you want to remove. Note that the attachment_id is different from the id you used to upload the file — it is only assigned once the file has been linked as an attachment to a specific record. Once you have the attachment_id, the body for your PUT request should look like this:

const attachment_id = //your attachment id

const request_body = {
  data: [
    {
      'HP_PO_Attachment': [
        {
        	attachment_id: attachment_id,
        	_delete: null
        }
      ]
    }
  ]
}

To figure out the attachment_id of the file you want to delete, send a GET request to the parent record’s endpoint and look for the API name of your custom file upload field. It will contain an array with objects for each uploaded file. Each file object will include an attachment_Id property (note the uppercase I) which is the value needed to delete that particular attachment.

"HP_PO_Attachment": [
    {
        "extn": "pdf",
        "is_Preview_Available": true,
        "download_Url": "/crm/org123456789/specific/ViewAttachment?fileId=ols...",
        "delete_Url": "/crm/org123456789/deleteattachment.do?attachmentid=259...",
        "entity_Id": 1234567000018813007,
        "mode": "pdfViewPlugin",
        "original_Size_Byte": "24478",
        "preview_Url": "/crm/org123456789/specific/ViewAttachment?fileId=ols...",
        "file_Name": "2021-06-25 PO 12345 for ABC Corp.pdf",
        "file_Id": "olse403dac866073e450a8b583540868d3e90",
        "attachment_Id": "1234567000318824020",
        "file_Size": "24.48 KB",
        "creator_Id": 1234567000000361183,
        "link_Docs": 0
    }
],

Maybe you are uploading a new version of a file that has already been uploaded and you want to delete the old copy since it’s out of date. If you know the file name of the file you want to replace, you can filter the existing attachments array to get the object with a matching file_Name and then use the attachment_Id of that object. (In the code below I’m assuming there’s only one matching file and just choosing the first element of the filtered array.)

const file_name = //your file name
const record = //the response from your GET request

const existing_attachments = record .HP_PO_Attachment
const [file_to_replace] = existing_attachments.filter(attachment => attachment.file_Name === file_name)
const attachment_id = file_to_replace.attachment_Id

const request_body = {
  data: [
    {
      'HP_PO_Attachment': [
        {
        	attachment_id: attachment_id,
        	_delete: null
        }
      ]
    }
  ]
}

Once you’ve deleted the existing attachment, you’ll be able to upload the new one without running into a maximum_length error.

Conclusion

I hope this saves you some effort in figuring out how to upload files. If you notice any mistakes or still have questions, please leave a comment below.

Zoho CRM: How to Access Multi-Select Lookup and User Fields from the API

If you’re banging your head on your desk trying to figure out how to use the Zoho CRM API to access a multi-user or multi-select lookup field, this post is for you.

Maybe you made a GET request and were surprised to find that your multi-select user field is completely missing from the response, even though you can see it right there on the GUI.

Maybe you want to update your multi-select lookup field with a PUT request but there seems to be a problem with how you’re sending in the data — you’ve tried every variation in syntax you can think of but when you send your PUT request and refresh the record’s page in the CRM, nothing changes with your lookup field.

Here’s your problem: Zoho created a secret module behind the scenes. It’s invisible from the GUI but you have to interact with it if you’re using the API.

This secret linking module functions as a junction table to track the many-to-many relationships you’ve created with your custom field. Say you add a multi-select user field to your Deals Module so you can assign multiple owners to the deal. Each time you add a user to a deal, Zoho creates a new record in the linking module to store the fact that User A is an owner for Deal X. If you add another user to the deal, you’ll get another record in the linking module: User B is an owner for Deal X. Deleting a user from the deal deletes the corresponding record in the linking module.

All this linking module activity happens automatically when you’re using the GUI but if you want to use the API, you will have to create and delete these linking module records yourself by making API calls to the linking module endpoint.

In typical Zoho fashion, none of this is well-documented. I had to google to find a semi-relevant community portal post and then click a link to reveal 13 hidden answers to the user’s question, one of which had a link to another post that finally contained an answer to a question that was similar-enough to my question that it also worked for me.

Meanwhile the official documentation just has these two examples which are presumably fine for single-select lookup and user fields but do absolutely nothing when you try to use them to create or update a record with a multi-select field:

Lookup (JSON object)
Accepts unique ID of the record, which you can get through Get Records API.
Example: "Lookup" : {
"id" : "425248000000104001"
}

User (JSON object)
This is a default look-up field to users in Zoho CRM.
Example: "User":
{
"name": "Patricia Boyle",
"id": "4150868000000623001"
}

You have to know what you’re looking for to find the Linking Module API documentation.

Accessing Linking Modules from the API

So how do you access data from the multi-user field? First you have to figure out the name of the linking module where the data is stored. To get a list of the modules in your account, send a GET request to the Modules API endpoint. (Make sure you use an access token that has been generated with a grant token that has been generated with a scope of ZohoCRM.settings.ALL.)

This GET request will give you a list of information about all your modules, including their API names. I’m using Postman to make this request and log the results I’m interested in. You can scroll through the JSON until you get to the module you’re looking for but an easier way is to map the array and grab just the API name for each module.

Look through your results until you find the linking module that corresponds to your custom field. In my case, the module at the very bottom, Deals_X_Users, was created automatically when I added a multi-select user field to my Deals module.

To confirm that you’ve found the correct module, you can use the Get Records API to view its data.

Each of the returned record objects in the data array represents a single relationship between two records. If you add two users to your deal, there will be two record objects on the Deals_X_Users module with that deal ID, one for each user.

Look at the data returned by your request to figure out which fields are your linking fields. These are the field names which correspond with the records on either side of the relationship. In my case the user data is stored in a field called Deal _Owners, which is the API name of the multi-user field I created. The deal data is stored in a system-generated field called userlookup221_1.

Now if I want to add a user to a deal, I just need to insert a new record in the Deals_X_Users module with the user’s id in the Deal_Owners field and the deal’s id in the userlookup221_1 field.

If you try to put the same record in more than once, you’ll get a duplicate association error: DUPLICATE_LINKING_DATA

If you want to filter the records in your linked module you can use a COQL Query. In this example I am getting only records where my deal field (userlookup221_1) matches a specific deal id. That lets me see all the users which have been assigned to the deal (so far, just one).

const deal_id = '2593949000017853009'

const body = {
    select_query: `Select userlookup221_1, Deal_Owners 
    FROM Deals_X_Users 
    WHERE userlookup221_1.id =${deal_id}`
}

pm.variables.set('body', JSON.stringify(body))

{
    "data": [
        {
            "Deal_Owners": {
                "id": "2593949000000361188"
            },
            "id": "2593949000017953401",
            "userlookup221_1": {
                "id": "2593949000017853009"
            }
        }
    ],
    "info": {
        "count": 1,
        "more_records": false
    }
}

That should give you all the pieces you need to get your data in and out of your CRM! If you still have questions or notice any mistakes, please leave a comment below.

How to Undo a Reconciliation in QuickBooks Online When You Don’t Have an Accountant

Sometimes you make a mistake with reconciling. If it’s just an issue with one or two transactions, you can change the reconciliation status from the register until everything that should be reconciled is showing as reconciled.

There are times, however, when you really need to undo the entire reconciliation. Maybe you were reconciling for December of the previous year but you didn’t pay attention when typing in the date and it auto-completed for December of the current year. Or maybe your beginning balance is off and you haven’t been able to figure out why so you want to go back a month or two and re-do the reconciliation to get everything straightened out.

You’d think there would be a straightforward way to do this, given that mistakes happen sometimes. Unfortunately QuickBooks thinks it knows better than you and does not provide an undo button. The justification given by QB support staff is that this restriction is “to prevent some admin users or master admin to mess up the books already reconciled.”

That’s a bunch of garbage, but fortunately there is a way to undo a reconciliation. It is a bit of a hassle but it won’t cost you any money. Compared to manually editing a whole month’s worth of transactions, this method is a piece of cake!

The answer repeated by the moderators over and over in the support thread is “contact your accountant and ask them to undo it for you.” Unlike a regular QuickBooks Online subscription, a QuickBooks Online Accountant profile has the ability to undo reconciliations for clients. But what if you don’t have an accountant?

You can create your own QuickBooks Online Accountant profile for free — no additional subscription is needed.

Disclaimer: I am not sure if this method will work if you already have an accountant connected to your company QuickBooks account. If that’s the case for you, you might have to ask your accountant to undo the reconciliation for you. But if you don’t already have a connected accountant, you can become your own accountant by following these steps:

1. Create an Accountant Profile

You can sign up here at QuickBooks Online Accountant. You’ll just need to use an email address that’s different from the one you use for your regular QuickBooks account.

2. Add Your Company as a Client

Once you’re signed up, you’ll see a Clients link in the left-hand menu under YOUR PRACTICE. Click on Clients and then click the big green Add client button at the top right-hand side of the screen.

All you have to do is enter the business name and email for your regular QB Online account. Make sure to click the No Subscription option and then click save. You should get an email invite to the email address you entered, which will allow you to accept the request and set your new Accountant profile as your accountant within QuickBooks.

Once you do that, you’ll have access to your company books through the Accountant profile by choosing it from the GO TO QUICKBOOKS dropdown at the top.

3. Undo the Reconciliation

This will bring you to the same view of your data that you’re used to in the regular company profile. From here it’s pretty simple to undo a reconciliation. View your reconciliation history for the account you want to undo, click the ACTION drop-down and choose Undo.

You’ll have to confirm several times that you really want to undo. Make sure you read the buttons carefully — all the default options cancel the undo to make it really hard to do by accident. With all these safety precautions, I don’t see any good reason why they don’t make the undo workflow available in the regular profile. If someone is authorized to reconcile, I think they can be trusted to undo a reconciliation as needed.

Once you’re done with all your undoing, you can log out of your accountant profile and ignore it until the next time you need to undo a reconciliation. Just remember which email address you used to sign in. Don’t make a second accountant profile and wonder why you’re not able to connect to your company. Yes, I say this from experience. 🤦

Pipedream: Replace Schedules with Webhooks to Reduce your Usage

I had a source component running on a timer to check Airtable for new or modified records every five minutes.

Every five minutes adds up to 1,440 invocations per day! That’s almost half the daily limit on the free tier of Pipedream.

I don’t remember if this was true back when I first set up this trigger, but the Airtable Automation feature now makes it possible to send a webhook whenever a record is created or updated.

When I changed my existing workflow to use a webhook source rather than a polling source, my Pipedream usage dropped dramatically:

Now I don’t have to worry about running out of Pipedream invocations anytime soon!

Zoho CRM: How to Fix Syntax Errors in Your Boolean Formula

When you create a Zoho CRM Formula field with a Boolean return type, you have to follow some very specific rules in order to avoid a syntax error.

For instance, wouldn’t it make sense to have your formula expression be a simple inequality? Nope, that produces a syntax error, even when the Formula Return Type is set to Boolean: “Syntax Error: Check the examples for any functions you’re using to see if you formatted them correctly. Make sure your fields are formatted like this: ${Module Name.Field Name}”

0 less than 1

According to the documentation, the formula expression for a boolean formula field must include a boolean function. Your options are If(), And(), Or(), and Not().

That explains why you can’t just compare the result of your Datecomp function with a value and call it a day. Unless you wrap it in one of the above boolean functions, you’ll get a syntax error like this:

I recommend using the And() function as your wrapper. You don’t actually need to put in two expressions; it works even if you only put in one:

One more thing to watch out for is the equals sign. You might think by looking at the list of operators that an equals sign is just an equals sign:

But when you type in your equality, you get a syntax error: “You used the wrong type of data in an argument. Check what you entered between the parentheses of your functions to make sure you put the right kind of data in the right place.” What could be the problem with 1=1?

Formula Expression
And(1=1)
You used the wrong type of data in an argument. Check what you entered between the parentheses of your functions to make sure you put the right kind of data in the right place.

If you actually click the Insert button to insert that Equals operator, the truth comes out. You need a double-equals, even though it just says “= Equals” on the list. Come on, Zoho. How hard is it to make the list item say “== Equals”? It would prevent so much frustration!

Formula Expression
And(1==1)
No errors

Watch out! The function names are case sensitive. AND is not the same as And:

Formula Expression
AND(1==1)
Syntax Error
Finally, once you save a formula field with a specific return type, it’s not possible to switch to a different return type. This is annoying when you want to check just a subset of your formula to see what value it returns, but it returns a different type from your full formula. You might have to make some formula fields with other return types just for testing purposes.

Leave a comment if you know of any other Zoho Formula Field gotcha’s — I’m sure there are plenty more that I just haven’t run into yet!

Zoho Mail API: How to Upload an Attachment

If you’re sending an email with the Zoho Mail API and you want to attach a file, you first need to upload the file in a separate request. This gave me some trouble at first but I finally figured it out!

Fork my Postman Collection to see a stand-alone Upload Attachment request:

Run in Postman

Or take a look at my Pipedream workflow to see the request in context: Download File from Zoho CRM and Upload as Attachment to Zoho Mail (You can click the code label at the bottom of each step to expand and view the Node.js code for that step.)

Read on to see my dysfunctional workflow attempts!

The Documentation

The Zoho Mail API documentation says to send a binary file in the request body but it does not give very much detail on how to do so. This is all there is:

Maybe this is enough if you already know what you’re doing but I have no idea what I’m doing so I had to look for further instructions. Fortunately, the documentation includes an example of how to make a request:

CloseableHttpClient httpclient = HttpClients.createDefault();
HttpPost request = new HttpPost(REQUEST_URL);
String FILE_PATH="C:/MyPictures/OurVacation.png";
File file = new File(FILE_PATH);
HttpEntity entity = new FileEntity(file);
request.setEntity(entity);
request.setHeader("Content-Type", "application/octet-stream");
HttpResponse response = httpclient.execute(request);
HttpEntity entity = response.getEntity();
if (entity != null) {
    InputStream instream = entity.getContent();
    try {

    } finally {
        instream.close();
    }
}

Unfortunately, I was not even sure what language the example code was using. It certainly wasn’t JavaScript so I didn’t look at it too closely.

Attempt #1: 404 Error

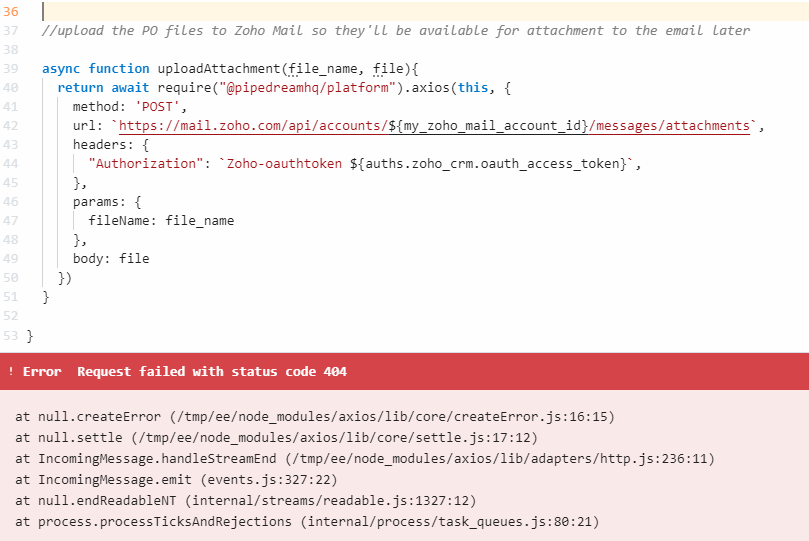
I put together my best guess at a request with a binary file in the body. Alas, my first attempt to upload an attachment failed with status code 404. Can you spot any errors?

//upload the PO files to Zoho Mail so they'll be available for attachment to the email later

async function uploadAttachment(file_name, file){
  return await require("@pipedreamhq/platform").axios(this, {
    method: 'POST',
    url: `https://mail.zoho.com/api/accounts/${my_zoho_mail_account_id}/messages/attachments`,
    headers: {
      "Authorization": `Zoho-oauthtoken ${auths.zoho_crm.oauth_access_token}`,
    },
    params: {
      fileName: file_name
    },
    body: file
  })
}

ErrorRequest failed with status code 404
at null.createError (/tmp/ee/node_modules/axios/lib/core/createError.js:16:15)
at null.settle (/tmp/ee/node_modules/axios/lib/core/settle.js:17:12)
at IncomingMessage.handleStreamEnd (/tmp/ee/node_modules/axios/lib/adapters/http.js:236:11)
at IncomingMessage.emit (events.js:327:22)
at null.endReadableNT (internal/streams/readable.js:1327:12)
at process.processTicksAndRejections (internal/process/task_queues.js:80:21)

At this point, the value I was passing into my file parameter was just the result of my request to download the file from Zoho CRM. I wasn’t sure what exactly I had in there, so I logged it to the console and beheld 278 lines full of mystery:

Did I need to put my data in a different format? Clearly I was out of my depth. I googled “pipedream download file and attach to email” to find some examples of file handling in Pipedream.

Attempt #2: fs.writeFileSync()

Inspired by this uploading-to-Google-Drive example, I tried saving my file to the file system using fs.writeFileSync() and then using fs.createReadStream() to put the file into my request. This made no difference to the error I was getting.

Attempt #3: s/data/body

I realized that I was storing the file in the body parameter when I should be using the data parameter to send data in the body of the request via axios. I corrected my mistake but continued to get the 404 error.

Attempt #4: Form-Data Content Type

Inspired by this upload-file-as-multipart-form-data example, I tried sending my file as a form-data content type. Still no success. After struggling with this for a while, I learned that the Zoho Mail API does not accept multipart/form-data.

Ok, so what should the content type be?

I went back to the documentation to look at the sample code. What language was it? Certainly not JavaScript and it didn’t look like Zoho’s Deluge Script either. I did some googling and realized it was Java using the Apache HttpClient. I considered digging deeper to find out what this code was doing behind the scenes — what did it mean to create a new FileEntity and how could I recreate that in Node.js? I decided that I didn’t want to go down the rabbit hole of investigating a module written in an unfamiliar language. It was time to try a different approach.

CloseableHttpClient httpclient = HttpClients.createDefault();
HttpPost request = new HttpPost(REQUEST_URL);
String FILE_PATH="C:/MyPictures/OurVacation.png";
File file = new File(FILE_PATH);
HttpEntity entity = new FileEntity(file);
request.setEntity(entity);
request.setHeader("Content-Type", "application/octet-stream");
HttpResponse response = httpclient.execute(request);
HttpEntity entity = response.getEntity();
if (entity != null) {
    InputStream instream = entity.getContent();
    try {

    } finally {
        instream.close();
    }
}

Attempt #5: Postman

I switched to Postman to see if I could successfully send a file using their helpful GUI. Maybe that would give me clues about what my Pipedream code needed to be.

When I ran into an authentication issue with the access token I’d copied from Pipedream, I realized I had made another mistake in my Pipedream request:

headers: {
      "Authorization": `Zoho-oauthtoken ${auths.zoho_crm.oauth_access_token}`,
    },

I was making a request to the Zoho Mail API using the Zoho CRM access token! That explained the OAUTH_SCOPE_MISMATCH error I was getting in Postman.

Attempt #6: Correct Access Token

I fixed my access token and ran the Postman request again. This time I got an HTTP Status 415 – Unsupported Media Type response. Yay, a new error! I must be making progress.

Attempts #7–???: Media Type Mystery

So what media type was supported? I tried uploading different file types in Postman — text files, pdfs, images — nothing was working. What is the media type supposed to be? I tried googling but nothing I found was specific to Zoho Mail; I kept getting results for Zoho Creator or Zoho CRM instead.

I went back to the documentation. “The binary file is mandatory and has to be sent in the Request Body.” How do I send a binary file? What’s the content type supposed to be for that?

I tried application/x-binary and application/pdf. I looked at the endless IANA list of media types and was very overwhelmed. I did more googling but was getting nowhere.


8:41 PM
Content-Type is header not set correctly
help.zoho.com
8:41 PM
CRM Lead to Desk Via API
help.zoho.com
8:41 PM
zoho mail api unsupported media type - Google Search
www.google.com
8:38 PM
Zoho Docs
docs.zoho.com
8:35 PM
415 Unsupported Media Type - KeyCDN Support
www.keycdn.com
8:35 PM
how to troubleshoot 415 unsupported media type - Google Search
www.google.com
8:34 PM
how to figure out what media type a server supports - Google Search
www.google.com
8:33 PM
Send Setup Shipment Notification Email | Edit - Pipedream
pipedream.com
8:31 PM
Media Types
www.iana.org
8:31 PM
MIME type - MDN Web Docs Glossary: Definitions of Web-related terms | MDN
developer.mozilla.org
8:31 PM
Content-Type - HTTP | MDN
developer.mozilla.org
8:31 PM
X-Content-Type-Options - HTTP | MDN
developer.mozilla.org

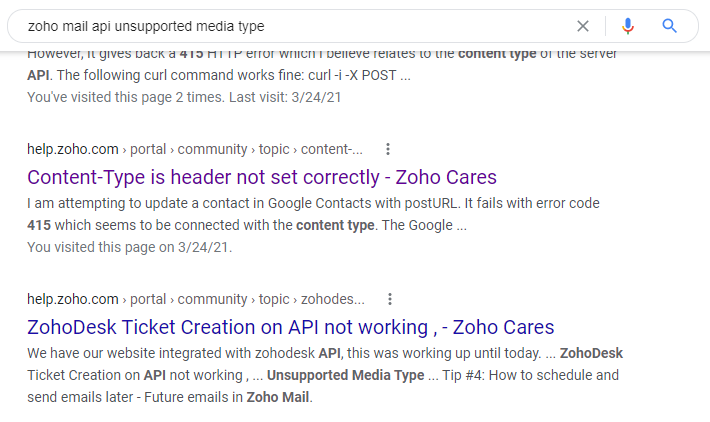
I finally came to a Zoho help page that looked promising:

zoho mail api unsupported media type

help.zoho.com > portal > community > topic
Content-Type is header not set correctly - Zoho Cares
I am attempting to update a contact in Google Contacts with postURL. It fails with error code 415 which seems to be connected with the content type. The Google...

This page turned out to be totally unrelated to the Zoho Mail API but I noticed it had an example with application/octet-stream as the content-type header, which I remembered seeing a few other places. I didn’t know what it meant but figured it was worth a try since I had run out of other ideas.

Final Attempt: Application/Octet-Stream

I pasted application/octet-stream into Postman and voila! A successful response!

Content-Type: application/octet-stream
{
    "status": {
        "code": 200,
        "description": "success"
    },
    "data": {
        "storeName": "655570225",
        "attachmentName": "Shopping List.pdf",
        "attachmentPath": "/Mail/56eab0625be651387d2ae-Shopping List.pdf"
    }
}

I finally did it! I uploaded an attachment to Zoho Mail using the API!

Get the Code for Yourself

Click below to fork my Postman Collection (all it has is the Upload Attachment request):

Run in Postman

After setting it up in Postman, it wasn’t too difficult to get the same request working in Pipedream. You can copy my finished workflow here if you want to remix it for your own Pipedream project: Download File from Zoho CRM and Upload as Attachment to Zoho Mail

const file = await fs.createReadStream(file_path)

  const response = await axios(this, {
    method: 'POST',
    url: `https://mail.zoho.com/api/accounts/${account_id}/messages/attachments`,
    headers: {
      "Authorization": `Zoho-oauthtoken ${auths.zoho_mail.oauth_access_token}`,
      'Content-Type': 'application/octet-stream'
    },
    params: {
      fileName: file_name
    },
    data: file
  })

  this.attachment = response.data

Conclusion

In retrospect, I should have paid more attention to the sample code on the documentation. The information I needed was right there, just past the part where I gave up trying to understand what was going on:

request.setEntity(entity);
request.setHeader("Content-Type", "application/octet-stream");

Since application/octet-stream was meaningless to me, it didn’t register to my brain as something important. My attention just skipped over it as I scanned the code for something helpful.

Note to self: always read the documentation carefully even when it doesn’t seem helpful at first glance. Don’t assume after the initial read-through that you’ve gained all you can from it. As you learn more about the problem, you’ll be better equipped to spot and interpret clues.

My big-picture takeaway from this experience is that I still have a lot to learn! One thing I’m thankful for is that I have enough meta-skills that I’m able to figure out the answer when I get stuck like this. It gives me confidence that I am on the right track. It might take a while before I really feel like I know what I’m doing, but I am getting there.

QuickBooks API: How to Fix an Invalid URL when Creating a Webhook

I was following the instructions on the Intuit Developer Webhooks documentation page to configure a webhook for my QuickBooks company.

It seemed simple enough but when I pasted the url of my heroku app into the Endpoint URL field, I got an error message: Please enter a valid URL.

I couldn’t see anything wrong with my URL. I had copied it from my browser tab after testing the endpoint in my browser. Why wasn’t it valid?

I looked at the documentation to see if there were any requirements I’d missed. Nope, nothing there. I did a google search to see if anyone else had run into this issue, but found nothing useful there either. I was stumped.

I went back to the Webhooks documentation just to see if there was anything I had missed. I looked at the example screenshot to see what a valid URL was like:

I noticed the https — my url was just http. Could that be it?

Yes! I changed my url from http to https and the error message was gone. I created a QuickBooks webhook!

Zoho Creator: How to Check if a Collection Variable is Empty

You might think the isNull() or isEmpty() functions would come in handy if you’ve tried to fetch some records and you want to see if any records were found. That didn’t work for me but there’s a simple alternative. Just use the count() function on the collection variable. If the count is zero, it’s empty! Otherwise there’s at least one record in there.

//Try to fetch some records
fetched_records = <form>[<criteria>];

//Check to see if any records were found
if (fetched_record.count() == 0){
	//No records were fetched.
}
else {
	//At least one record was fetched.
}